TiLDA MK3: Difference between revisions
Marekventur (talk | contribs) |
No edit summary |
||
| (52 intermediate revisions by 14 users not shown) | |||
| Line 1: | Line 1: | ||
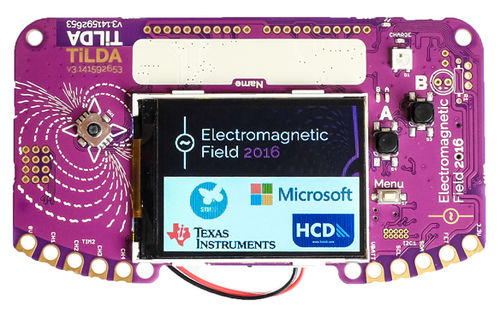
[[File:TiLDA_MK3_front.jpg|right|500px|TiLDA Mkπ]] | |||
== Using your badge == | == Using your badge == | ||
<div style="background-color: #FFFFDD; border: 1px solid #808000; padding: 5px;"><strong>If you just got your badge and it doesn't do anything</strong>, don't despair, quite a few of them need to be [[TiLDA_MK3/reset|factory reset]] before showing the loading screen. Press and hold <code>MENU</code> while quickly pressing the reset button at the back. Keep the <code>MENU</code> button hold for another 2 seconds while the green light on the front is blinking. Release it <i>while</i> the green light <b>and</b> the screen back light is on. If you got it correct the red light should flash.<br>If this doesn't work you can [[TiLDA_MK3/Firmware_Update|update the badge firmware]]. If this doesn't work, please come and join us in #emfcamp-badge on [https://libera.chat/ Libera IRC]</div> | |||
<div style="background-color: #DDFFFF; border: 1px solid #808000; padding: 5px;">If you're having problems downloading some apps from the App Library <b>please update your badge via the App Library update option</b>. After a restart it should work much smoother.</div> | |||
=== Assembly === | === Assembly === | ||
With your badge you will receive a booklet explaining how it's done. If you have any problems, please come to the Badge Operation Center and we will help you. | |||
=== Basic usage === | === Basic usage === | ||
| Line 10: | Line 16: | ||
If at any point you want to restart your badge you can just press the reset button at the back. | If at any point you want to restart your badge you can just press the reset button at the back. | ||
==== Changing your name ==== | |||
# Press 'Menu' | |||
# Select the 'Change Name' app and press 'A' | |||
# Use the joystick and 'A' key to enter your name | |||
# Press 'Menu' to save your name and reset the badge - your name should now be displayed! | |||
==== Installing new apps ==== | |||
# Press 'Menu' | |||
# Select the 'App Library' app and press 'A' | |||
# Select "Browse App Store" | |||
# Select a category and then an app. Wait until you see the description and press "A" to save it. | |||
# Press B a few times (or alternatively MENU) to restart your badge | |||
# On the home screen you can now press MENU and select "View all" to find your newly installed app. If you want to pin it to the quick launcher screen select your app and press MENU. If you just want to start it press A instead. | |||
=== WiFi === | === WiFi === | ||
Your TiLDA Badge has built-in wifi support. It should all just work if you're at the campsite, but if you're on your own network you might have to tell the badge about it. For more information please have a look here: [[TiLDA MK3/wifi|WiFi]] | Your TiLDA Badge has built-in wifi support. It should all just work if you're at the campsite, but if you're on your own network you might have to tell the badge about it. For more information please have a look here: [[TiLDA MK3/wifi|WiFi]] | ||
<strong>A word of warning</strong>: During EMF the badge will use "emf-insecure". This is, as the name implies, not the most secure way of transmitting data. On top of that there are some problems with HTTPS and SSL, so we're not using it for with the default apps (we're working on it!). Please <span style="color:red">don't send anything private or important to or from the badge via wifi</span>. | |||
=== Charging === | === Charging === | ||
| Line 25: | Line 43: | ||
Don't worry, you can always "factory reset" your badge. Please follow these instructions: [[TiLDA_MK3/reset|Resetting]] | Don't worry, you can always "factory reset" your badge. Please follow these instructions: [[TiLDA_MK3/reset|Resetting]] | ||
If everything else absolutely fails, you can try following these instructions (advanced): [[TiLDA_MK3/Firmware_Update]] | |||
== Hacking your badge == | == Hacking your badge == | ||
One of the main goals of TiLDA is to make hacking it as easy as possible. | |||
'''[[TiLDA_MK3/Introduction_to_badge_hacking|Badge Hacking Workshop Documentation]]''' | |||
One of the main goals of TiLDA is to make hacking it as easy as possible. All you need to do so is a computer with USB and your badge. | |||
* '''[[TiLDA MK3/Get Started|Step-by-step: How to get started]]''' | |||
* '''[[TiLDA MK3/Run Code|3 Ways to run code on your TiLDA]]''' | |||
* [[TiLDA MK3/App Store Submissions|App Store Submissions]] | |||
The badge itself runs code written in the computer language [https://en.wikipedia.org/wiki/Python_(programming_language) Python] which is run by a bit of software called [https://micropython.org/ Micropython]. | The badge itself runs code written in the computer language [https://en.wikipedia.org/wiki/Python_(programming_language) Python] which is run by a bit of software called [https://micropython.org/ Micropython]. | ||
For more information about the functions available please have a look at the [[#Badge API|Badge API]] section of this page. | |||
If you're already familiar with all this you can jump right into the topic of Apps. Apps can be shared via the EMF App Library or by copying files of and on via USB. If you want to know more about how this works go to [[TiLDA MK3/apps]] | |||
In case you're more interested in what makes the hardware tick and your confident with C++ and microprocessors then you can work directly with the micropython code that runs TiLDA: [[TiLDA MK3/build|How to build the firmware from scratch]] | |||
All code used is hosted on Github. Contributions and PR are very welcome! | |||
* https://github.com/emfcamp/micropython | |||
* https://github.com/emfcamp/Mk3-Firmware | |||
* https://github.com/emfcamp/Mk3-Server | |||
=== Some ideas === | |||
[[TiLDA MK3/Ideas|Please share what you've done (or want to do) with others!]] | |||
[https://github.com/emfcamp/Mk3-Hardware/blob/master/case-final.dxf Laser cut case files] | |||
The files used in the '''Fab Lab Truck''' for lasercutting are available here: http://www.thingiverse.com/thing:1707973 | |||
== Badge API == | |||
- [[TiLDA MK3/rtc|RTC]] (real time clock) | === Build-in === | ||
* [http://docs.micropython.org/en/latest/pyboard/ documentation] - General Micropython libarary | |||
* [[TiLDA MK3/ugfx|uGFX]] - The TiLDA LCD colour screen | |||
* [[TiLDA MK3/documentation/cc3100|CC3100]] - The wifi chip | |||
* [[TiLDA MK3/rtc|RTC]] (real time clock) | |||
* [[TiLDA MK3/adc|ADC]] (analogue reading) | |||
* [[TiLDA MK3/timer|Timer]] | |||
* Microcontroller peripherals [https://docs.micropython.org/en/latest/pyboard/library/pyb.html] (Timers, PWM, serial, [[TiLDA MK3/spi|SPI]] etc) | |||
- | === TiLDA Libraries === | ||
On top of the build-in modules above we have also created a bunch of helpful libraries written in python. If you go through the bootstrap process or use the App Library you should always have a full set of those on your badge. If for some reason this isn't the case you can download our repository from https://github.com/emfcamp/Mk3-Firmware and copy the <code>lib</code> folder onto your badge. | |||
- | TBD, for now please have a look at the libraries themselves: https://github.com/emfcamp/Mk3-Firmware/tree/master/lib | ||
* [[TiLDA MK3/lib/buttons|buttons]] | |||
* database | |||
* dialogs | |||
* filesystem | |||
* http_client | |||
* imu | |||
* wifi | |||
* NTP Example: https://gist.github.com/drrk/4a17c4394f93d0f9123560af056f6f30 | |||
* On board LED "[[TiLDA MK3/NeoPixel|NeoPixel]]" example: https://github.com/mayhem/tilda-mk3-led-demo | |||
- | Full hardware files are on GitHub [https://github.com/emfcamp/Mk3-Hardware] | ||
(feel free to add additional ideas, and create links new wiki pages to on-going projects, perhaps someone will want to contribute) | (feel free to add additional ideas, and create links new wiki pages to on-going projects, perhaps someone will want to contribute) | ||
== Badge hardware == | == Badge hardware == | ||
TiLDA comes with a long list of very useful hardware. Some might be obvious, but some are a bit hidden. | |||
* Colour LCD screen 320x240 | |||
* Joystick and A/B/Menu Buttons | |||
* Wifi (cc3100) | |||
* Accelerometer | |||
* Compass | |||
* Buzzer | |||
* Battery | |||
* <s>WS2812B aka "Neo Pixel"</s> on port PB13. [https://badge.emfcamp.org/wiki/TiLDA_MK3/How_to_fix_NeoPixel Sadly defunct] | |||
* MicroSD slot | |||
Harware files are available on GitHub [https://github.com/emfcamp/Mk3-Hardware]. | |||
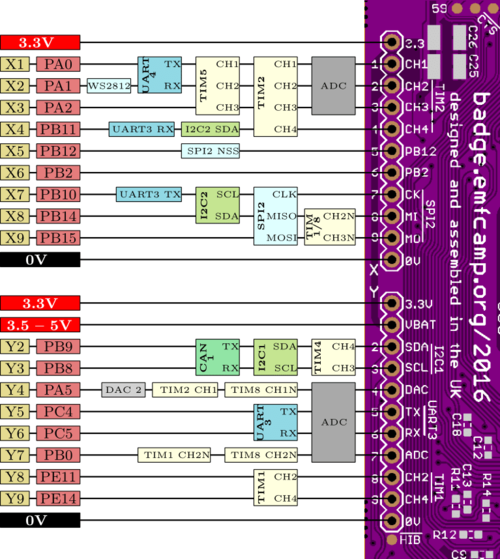
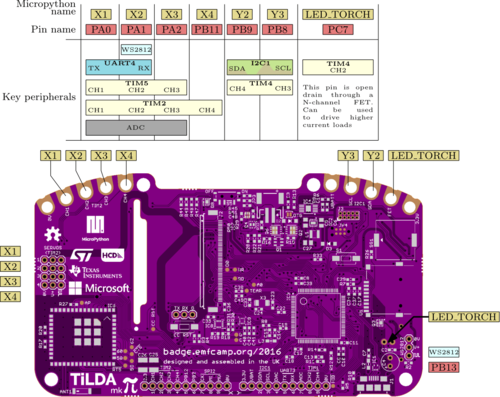
NOTE: The WS2812B is actually on pin PB13, not X2 as shown below! | |||
[[File:pinout-1.png | 500px]] [[File:pinout2-1.png | 500px]] | |||
Latest revision as of 08:16, 26 May 2021
Using your badge
MENU while quickly pressing the reset button at the back. Keep the MENU button hold for another 2 seconds while the green light on the front is blinking. Release it while the green light and the screen back light is on. If you got it correct the red light should flash.If this doesn't work you can update the badge firmware. If this doesn't work, please come and join us in #emfcamp-badge on Libera IRC
Assembly
With your badge you will receive a booklet explaining how it's done. If you have any problems, please come to the Badge Operation Center and we will help you.
Basic usage
After you have assembled your badge you can just use the tiny switch at the bottom of the screen to turn your badge on. Alternatively you can use any USB power source. If you turn your badge on for the first time (or if for some reason it has reset itself) you will get some on-screen information while we try to download the newest set of software.
If at any point you want to restart your badge you can just press the reset button at the back.
Changing your name
- Press 'Menu'
- Select the 'Change Name' app and press 'A'
- Use the joystick and 'A' key to enter your name
- Press 'Menu' to save your name and reset the badge - your name should now be displayed!
Installing new apps
- Press 'Menu'
- Select the 'App Library' app and press 'A'
- Select "Browse App Store"
- Select a category and then an app. Wait until you see the description and press "A" to save it.
- Press B a few times (or alternatively MENU) to restart your badge
- On the home screen you can now press MENU and select "View all" to find your newly installed app. If you want to pin it to the quick launcher screen select your app and press MENU. If you just want to start it press A instead.
WiFi
Your TiLDA Badge has built-in wifi support. It should all just work if you're at the campsite, but if you're on your own network you might have to tell the badge about it. For more information please have a look here: WiFi
A word of warning: During EMF the badge will use "emf-insecure". This is, as the name implies, not the most secure way of transmitting data. On top of that there are some problems with HTTPS and SSL, so we're not using it for with the default apps (we're working on it!). Please don't send anything private or important to or from the badge via wifi.
Charging
The badge charges via a microUSB socket, and takes about 2-3 hours for a full charge. The red charge LED next to the USB connector will extinguish when charging is complete
Nothing works! Help!
Don't worry, you can always "factory reset" your badge. Please follow these instructions: Resetting
If everything else absolutely fails, you can try following these instructions (advanced): TiLDA_MK3/Firmware_Update
Hacking your badge
Badge Hacking Workshop Documentation
One of the main goals of TiLDA is to make hacking it as easy as possible. All you need to do so is a computer with USB and your badge.
The badge itself runs code written in the computer language Python which is run by a bit of software called Micropython.
For more information about the functions available please have a look at the Badge API section of this page.
If you're already familiar with all this you can jump right into the topic of Apps. Apps can be shared via the EMF App Library or by copying files of and on via USB. If you want to know more about how this works go to TiLDA MK3/apps
In case you're more interested in what makes the hardware tick and your confident with C++ and microprocessors then you can work directly with the micropython code that runs TiLDA: How to build the firmware from scratch
All code used is hosted on Github. Contributions and PR are very welcome!
- https://github.com/emfcamp/micropython
- https://github.com/emfcamp/Mk3-Firmware
- https://github.com/emfcamp/Mk3-Server
Some ideas
Please share what you've done (or want to do) with others!
The files used in the Fab Lab Truck for lasercutting are available here: http://www.thingiverse.com/thing:1707973
Badge API
Build-in
- documentation - General Micropython libarary
- uGFX - The TiLDA LCD colour screen
- CC3100 - The wifi chip
- RTC (real time clock)
- ADC (analogue reading)
- Timer
- Microcontroller peripherals [1] (Timers, PWM, serial, SPI etc)
TiLDA Libraries
On top of the build-in modules above we have also created a bunch of helpful libraries written in python. If you go through the bootstrap process or use the App Library you should always have a full set of those on your badge. If for some reason this isn't the case you can download our repository from https://github.com/emfcamp/Mk3-Firmware and copy the lib folder onto your badge.
TBD, for now please have a look at the libraries themselves: https://github.com/emfcamp/Mk3-Firmware/tree/master/lib
- buttons
- database
- dialogs
- filesystem
- http_client
- imu
- wifi
- NTP Example: https://gist.github.com/drrk/4a17c4394f93d0f9123560af056f6f30
- On board LED "NeoPixel" example: https://github.com/mayhem/tilda-mk3-led-demo
Full hardware files are on GitHub [2]
(feel free to add additional ideas, and create links new wiki pages to on-going projects, perhaps someone will want to contribute)
Badge hardware
TiLDA comes with a long list of very useful hardware. Some might be obvious, but some are a bit hidden.
- Colour LCD screen 320x240
- Joystick and A/B/Menu Buttons
- Wifi (cc3100)
- Accelerometer
- Compass
- Buzzer
- Battery
WS2812B aka "Neo Pixel"on port PB13. Sadly defunct- MicroSD slot
Harware files are available on GitHub [3].
NOTE: The WS2812B is actually on pin PB13, not X2 as shown below!


